WEBLOG
WordPress > 実装フロー
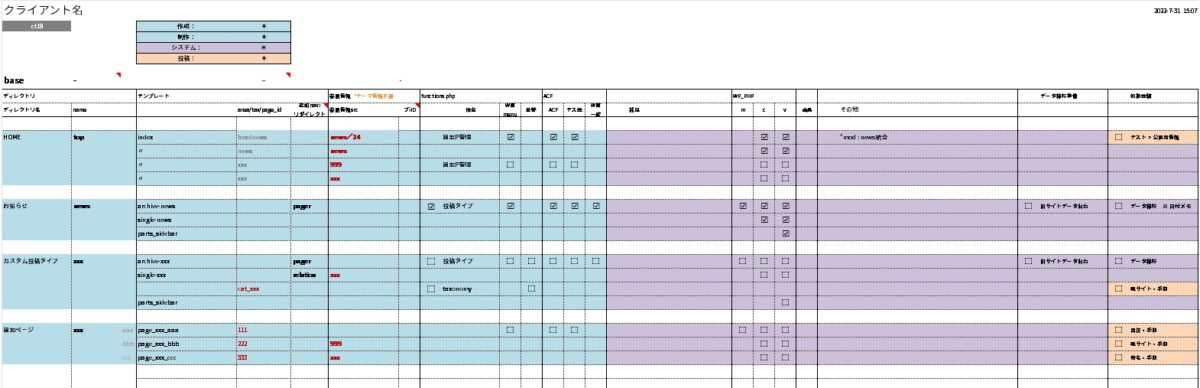
WordPress実装の流れ(OLDOFFICE限定)
Create:
Update:
概要
弊社オールドオフィスのWordPress実装フローです。
一般的なものではなく、弊社のモジュールなどがセットされた状態からの実装方法です。
ここでは全体の大きな流れを記載します。
計画
先ずは、計画書の作成。
計画書はエクセルで作成します。
案件ごとにどれくらいの実装ボリューム、テンプレート別にタスクを一覧で作成します。
カスタム投稿タイプとカスタムタクソノミー
functions.php に必要な設定値を記入し、カスタム投稿タイプとカスタムタクソノミーを発行します。
カスタム投稿タイプ
const CUSTOM_POSTTYPE = [
	'xxx' => [
		'name' => 'サンプルカスタム投稿タイプ名称',
		'posts_per_page' => 10,
		'editor' => [
			'type' => 'classic',
			'tinymce' => ['link', 'unlink'],
		],
		'route' => [
			'archive_path' => 'auto',
			'single_auto_slug' => true,
			'page_in_posttype' => [],
		],
		'sitemap' => [
			'archive' => '0.5',
			'single' => '0.6',
			'add_arg' => [],
		],
		'columns' => [
			'author' => false,
			'column' => [
			],
		],
	],
];
カスタム投稿タイプごとに上記の設定値(名称、初期取得ポスト数、ルーティング、sitemap.xml、管理画面の一覧表示項目)を設定します。
カスタムタクソノミー
const CUSTOM_TAXONOMY = [
	'cat_xxx' => [
		'name' => 'カテゴリー(XXX)',
		'post_type' => 'xxx',
		'style' => 'radio',
		'tax_type' => 'taxonomy',
		'posts_per_page' => 10,
		'editor' => 'classic',
	],
];
カスタムタクソノミーごとに上記の設定を行います。
管理画面ダッシュボードとサイドメニュー
functions.php に必要な設定値を記入し、ダッシュボードとサイドメニューを同時に作成します。
const WPADMIN_NAV = [
	'サンプル投稿タイプ名' => [
		'type' => 'posttype',
		'path' => 'edit.php?post_type=xxx',
		'user' => [2],
	],
	'サンプル固定ページ名' => [
		'type' => 'page',
		'path' => 'post.php?post=999&action=edit',
		'user' => [2],
	],
	'メディア' => [
		'type' => 'media',
		'user' => [],
	],
	'ユーザー' => [
		'type' => 'user',
		'user' => [],
	],
];
上記で設定します。
Model作成
class XxModel extends OoAttr
{
	public function getAttr($post_id)
	{
		/* post */
		$post = (object) [];
		// base
		$post->post_id = $post_id;
		$post->post_title = get_the_title($post_id);
		$post->permalink = get_permalink($post_id);
		// dete
		$post->post_date = get_the_date('Y/n/j(D)', $post_id);
		// content
		$post->post_content = parent::post_content($post_id);
		// acf
		$post->acf_text = $this->acf('acf_text', $post_id)->get();
		$post->acf_texts = $this->acf('acf_texts', $post_id)->textarea()->get();
		return $post;
	}
}
上記でDBからの情報取得ロジックを記述します。
controller作成
xxx_archive_controller(アーカイブコントローラー)
/* model */
include_once TEMPLATEPATH . '/model/XxModel.php';
$XxModel = new XxModel();

/* archive */
$arr = [];
$the_query = $wp_query;
if ($the_query->have_posts()) {
	while ($the_query->have_posts()) {
		$the_query->the_post();
		$arr[] = $XxModel->getAttr($the_query->post->ID);
	}
}
$wp_archive_posts = $arr;

/* title */
$archive_name = 'xx一覧';
$archive_name .= is_paged() ? ' [ ' . get_query_var('paged') . '/' . $the_query->max_num_pages . ' ]' : '';
if (is_year()) {
	$wp_archive_title = get_query_var('year') . '年の' . $archive_name;
} else {
	$wp_archive_title = '' . $archive_name;
}
上記でDBの取得レコードを指定します。
xxx_single_controller(シングルコントローラー)
/* model */
include_once TEMPLATEPATH . '/model/XxModel.php';
$XxModel = new XxModel();

/* single */
//	if( get_post_status( $GET_post_id ) ) {
$the_query = $wp_query;
if ($the_query->have_posts()) {
	$the_query->the_post();
	$obj = $XxModel->getAttr($the_query->post->ID);
}
$wp_single_post = $obj;

/* title */
$wp_single_title = $wp_single_post->post_title;
シングルの場合の取得です。
view(テンプレート)
コントローラーを自動で include するので、そのまま view に値を反映。
<ul>
<?php	foreach ($wp_archive_posts as $post) : ?>
	<li><a href="<?= $post->permalink ?>"><?= $post->post_title ?></a></li>
<?php	endforeach; ?>
</ul>
データの移行
旧サイトからのデータ移行すれば完成
